I don’t care how hot Bloglovin’ or Feedly are, or even Twitter/Facebook/Periscope or whatever new social media is all the rage.
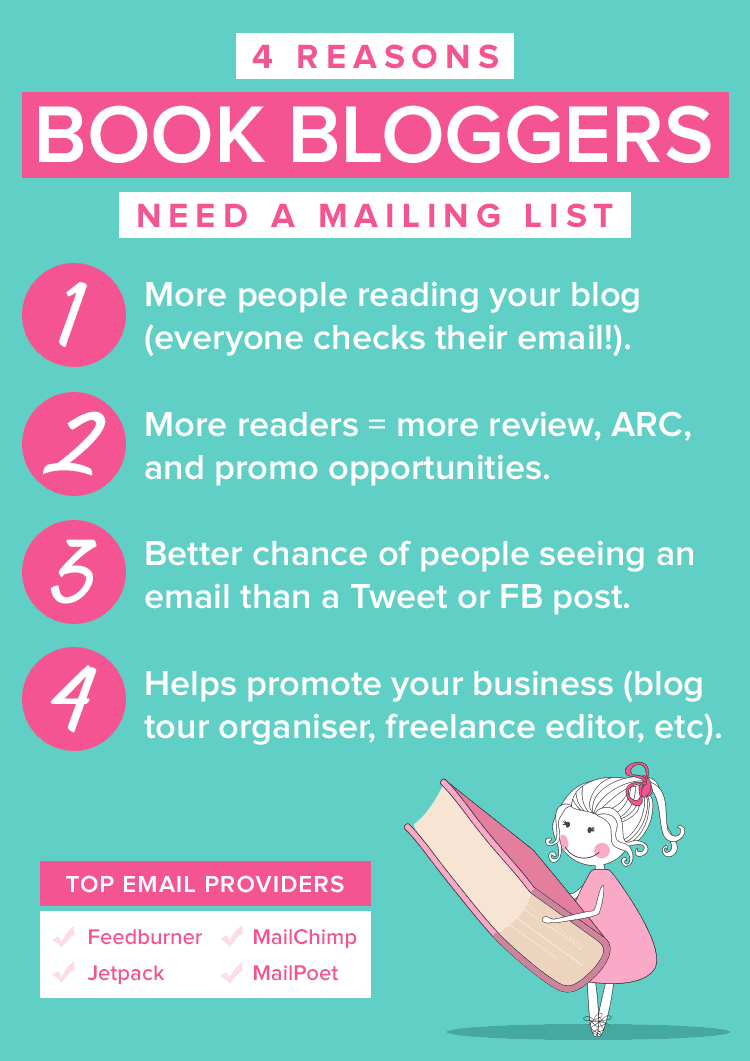
The #1 subscription avenue you should be promoting is email.
Above all others: email.
Email is the best and most reliable way to get people to read your content.
- People check their email all the time. They’re more likely to see posts and messages that get sent directly to their inbox.
- Social media sites go in and out of fashion. Imagine if you’d been pushing MySpace to your readers and telling people to follow you there. Where would you be now? With zero followers, that’s where.
- If a social media site shuts down, you could lose everything. Remember when Google Reader shut down and everyone was scrambling to try to migrate their subscribers elsewhere? An email is an email. It only shuts down if the owner of it chooses to delete it.
- Algorithms change, but email doesn’t. I see people on Facebook constantly complaining about low visibility and low engagement because people aren’t seeing their messages. They complain that their 20,000 likes are useless. But if someone subscribes via email, the message is getting in their inbox and in front of their eyes. Period.
- Email conversion rates still dominate. When it comes to conversions, email is massively more effective than Facebook and Twitter[source]. The average email open rate is 20.2%. The average Facebook reach is between 2% and 6% depending on your number of likes. Only 8-10% of your Twitter followers see your tweets. [source]
There are 2 main things you can do with your list of email subscribers.
You can do one of these or both of these, it’s totally up to you.
1) Send subscribers your blog posts.
This is typically called an “RSS-driven campaign”. It means you give your email service (like MailChimp) your RSS feed, and your service uses that to automatically send out the content of your blog posts in an email.
This is a great way to keep your subscribers updated with what’s going on in your blog.
2) Send separate, customized messages that aren’t posted on your blog.
Some people choose to segment their newsletter from their blog and deliver different content to each one. So anyone and everyone can visit your blog to get some content, but then you send extra special content to your email subscribers.
These are called “campaigns”. It’s kind of like the normal process of writing an email, but you send it to your entire mailing list instead of one individual.
3 ways to build your mailing list.
We’ve talked about why you should build your list and we’ve talked about what you should send to your list. Now let’s talk about how to grow your list.
Putting a single opt-in into your sidebar isn’t enough.
If you just add one single opt-in form to your sidebar, you’re not going to get many subscribers. You’ll get a few, but you won’t be growing your list in the best way possible.
Let’s go over some other ways you can build your list quickly and easily.
#1: Host a giveaway for subscribers
This is actually my least favourite method because I find it results in a bunch of throwaway accounts being subscribed. You’re less likely to get people who are truly interested in what you’re offering. They’re just interested in the free product.
But with that disclaimer out of the way, it’s still something you can do.
- Host a giveaway.
- Have one of the optional entries be to subscribe via email.
- Be sure to verify that the winner you select has actually subscribed!
This will result in plenty of new email subscribers.
#2: Add more opt-in forms.
Remember what I said about that one opt-in being enough? That’s why you add more!
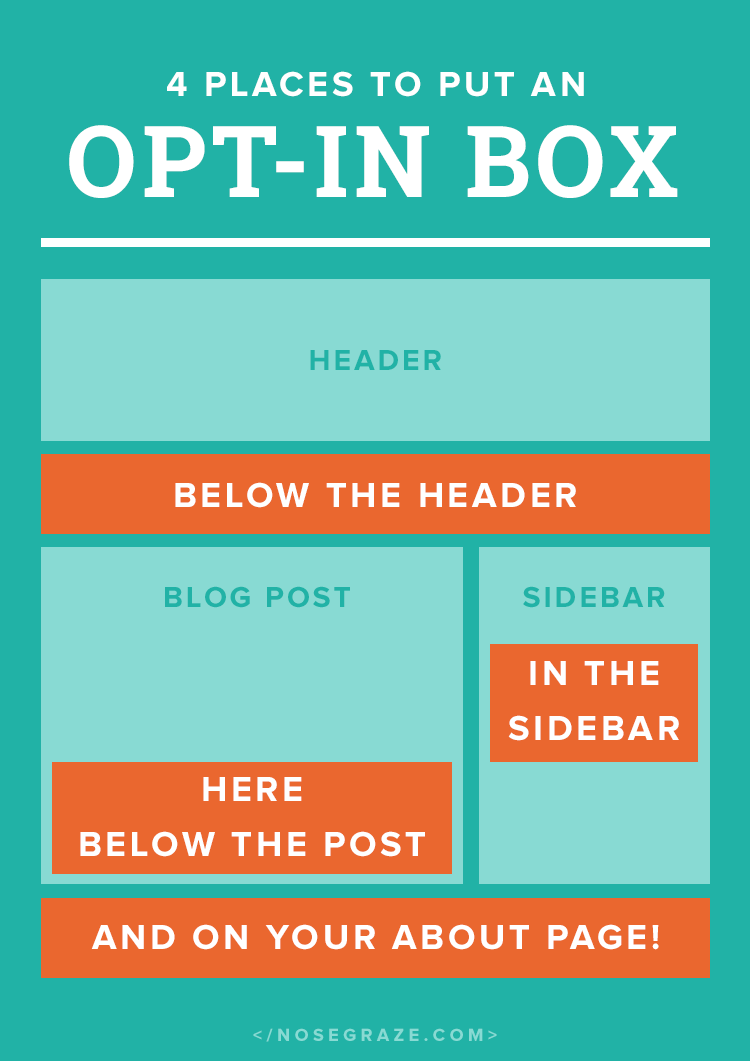
- Add one right below your header. This will catch peoples’ eyes straight away.
- Add one in your sidebar. Some people naturally look to the sidebar for a way to subscribe.
- Add one after each post (click here to find out how!). People will want to subscribe right after reading an AWESOME post.
- Add one to your about page (this has been very successful for me). When people learn more about you, they’ll be like OH MY GOD THIS PERSON IS AMAZING and will want to get all your content immediately.
#3: Add content upgrades to blog posts.
A content upgrade is a free piece of content, but you have to enter your email (and subscribe to your list) in order to get it.
- Create an awesome blog post.
- Provide plenty of valuable content in that post.
- Then think of something EXTRA that you could add. This is above and beyond.
- Put that EXTRA content into a PDF.
- Add an opt-in box below your blog post.
- Only give people access to the PDF after they’ve signed up for your list.
Want an example? Check out my post on how to create a scrolling text box. At the end, I give people the chance to download the free plugin.
It’s important to see that I don’t require people to enter their email to get all the content. If that were the case, no one would sign up (or very few people). You can’t require an email for the entire thing. Instead, I offer a complete tutorial on how to create the scrolling text box. The upgrade is the exact same thing with more features in an easy-to-install, done-for-you format. It’s an EXTRA—it’s not the entire thing.
Give people some value 100% for free.
Have them subscribe to get even more.
Want some free content upgrade ideas?
I’ve put together a list of 12 ideas for content upgrades, specifically for book bloggers! Simply enter your email address below to download the free PDF.
Free Download
Download “Content Upgrades for Book Bloggers”book-blogger-content-upgrades.pdf – 33.39 KB
How to choose an email service that works for you.
You might have gotten this far and be thinking:
“All that’s well and good, but how the bloody hell do I actually get people on my list?? What service do I use??”
Not to worry! We’ll get this all covered.
There are a variety of services to choose from. Some are free and some are paid. Like with anything in life, you get what you pay for. If you want more features, more integrations, and more support, you have to pay for that.
I’ve put together a list of some of the most popular providers. You can easily compare them with this snazzy table:
Compare the features of these email marketing services:
| Feedburner | Jetpack | MailChimp | MailPoet | |
|---|---|---|---|---|
| Price | Free | Free | Free up to a certain point. Then $10+ per month. | Free, with optional premium upgrade. |
| Platform | Any | WordPress | Any | WordPress (self-hosted only) |
| Subscriber limit | None | None | 2,000 (then you have to pay) | 2,000 (then you have to pay) |
| Manual campaigns | ||||
| RSS-driven campaigns (for sending blog posts) | ||||
| Autoresponders (send freebies/downloads after they subscribe) | (paid plans only) |
|||
| Custom template design | ||||
| WordPress shortcodes work in emails | ||||
| Sending reliability | Reliable | Reliable | Very reliable | Medium (depends on the sending options you choose and your cron jobs) |
| Set up difficulty | Easy | Easy | Medium | Hard (set up custom cron job, choose and configure a reliable sending platform) |
Objectively, MailChimp is the best and most reliable platform.
- It’s feature-rich.
- You can customize your email template to look like your design.
- MailChimp specializes in email deliverability to ensure that each subscriber receives each message.
- There is a slight set up process to design your template, set up your lists, and put the opt-in on your site, but the small set up time is worth the pay off.
- With a paid account, you can set up professional automations that get triggered when certain actions are performed. For example: you can automatically send someone an email when they join your list (welcome email, free download), or schedule entire email series to be sent out when someone joins a list (like an email course).
A professional service like MailChimp is a worthwhile investment for any blog or business. If building traffic or sales is high on your list of priorities, you should be manning up and paying for a quality email service like MailChimp. It’s an investment that will help your site grow.
But if you’re not prepared to pay, you can use one of the free choices.
If you go with MailChimp, you need to be prepared to pay. If not right away, then at some point, because you will need to pay if you exceed 2,000 subscribers and/or 12,000 emails per month. If you’re not prepared to do that, then look into one of the free choices instead.
Feedburner is my favourite free option.
For quickest and easiest, I suggest Feedburner. I prefer Feedburner over Jetpack because your WordPress shortcodes will not work with Jetpack. They all get stripped out. This is particularly annoying if you use the Ultimate Book Blogger plugin.
MailPoet has a lot of features but is more complex to set up.
Although MailPoet is very robust, I wouldn’t recommend it unless you’re more tech-savvy and don’t mind getting your hands dirty. I say this because in order to actually ensure your emails get sent, you have to go through two extra steps:
- Set up a real cron job. If you use WP-Cron then you’ll have a hard time getting your emails sent out. This is for the same reason that sometimes scheduled posts don’t publish.
- You have to configure sending with a third party service. You can’t just send emails from your hosting account. Well, you can, but most hosts have limits (like you can only send 500 per day). If you have a lot of subscribers, that’s a problem! So you’ll have to go through extra steps to connect MailPoet to Mandrill or SendGrid.
How to get started with MailChimp.
For those of you awesome folks who choose MailChimp, I’m going to walk you through some set up! First, go ahead and create your account on mailchimp.com. Then we can get started!
Create your first list.
Luckily the MailChimp interface is very straightforward. Your first step is going to be to create a list for all of your subscribers to be added to. This can easily be done by clicking the “Lists” tab at the top of the page.
Then click the Create List button in the top right.
If you get the below notice, then click Create List again.
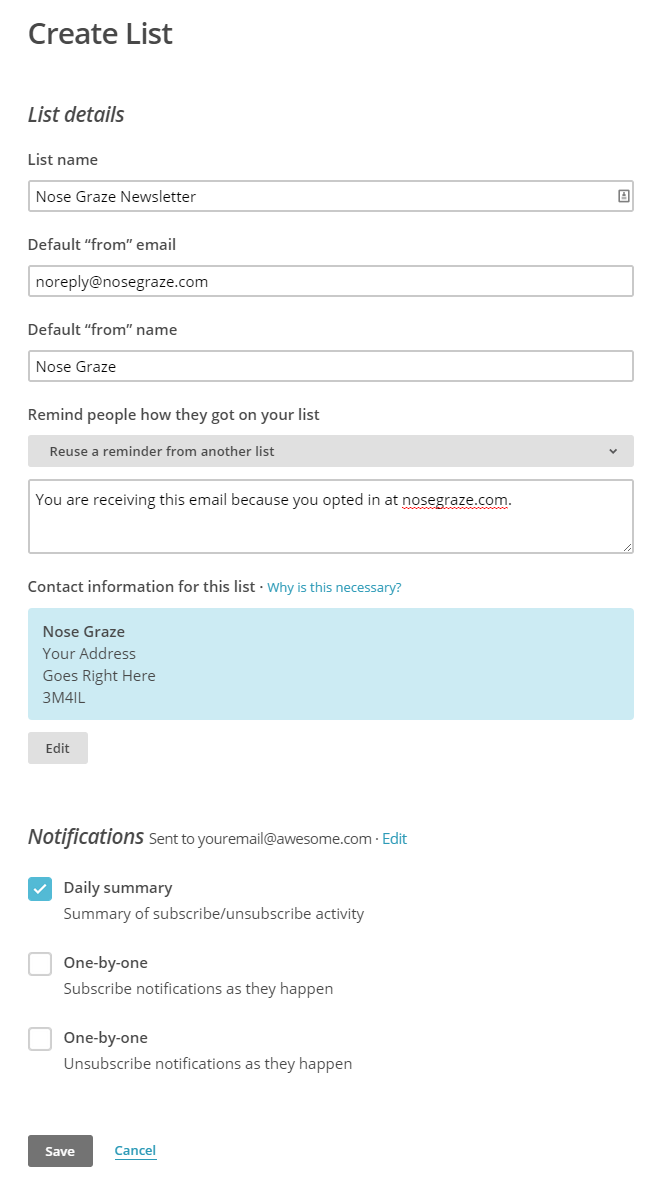
Then you’ll be taken to a simple form to fill out with the list name and a few other details. Simply work through each field and fill it out. Here’s mine:
Create your signup form for your website.
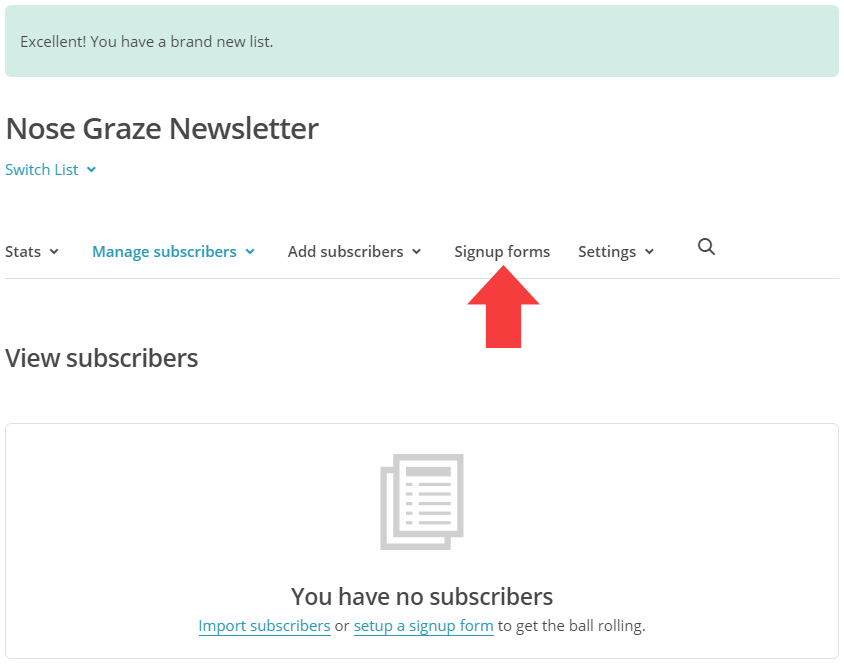
Next we can create your first signup form! After creating the list, you should have been redirected to a new page. Click the link for Signup forms, as shown below:
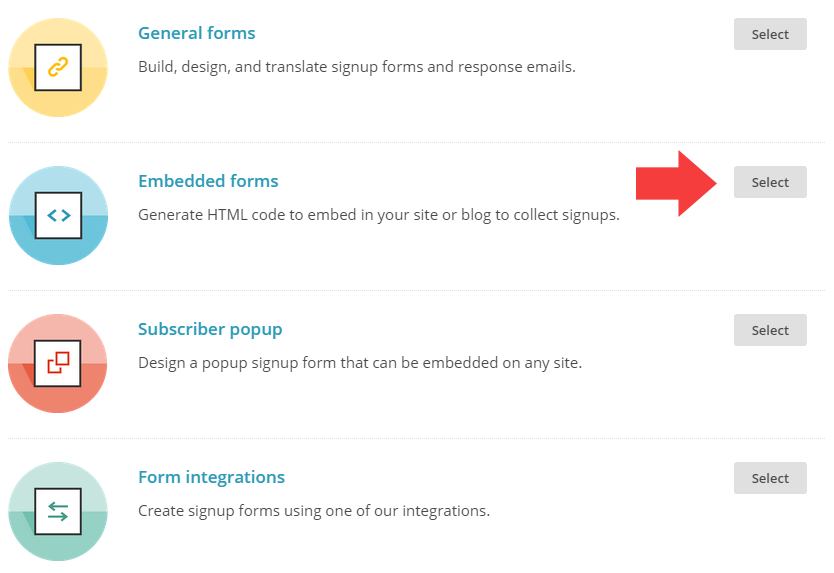
On the next page you’ll be presented with four different form choices:
Since we want to embed this on our blog, click Select next to Embedded forms.
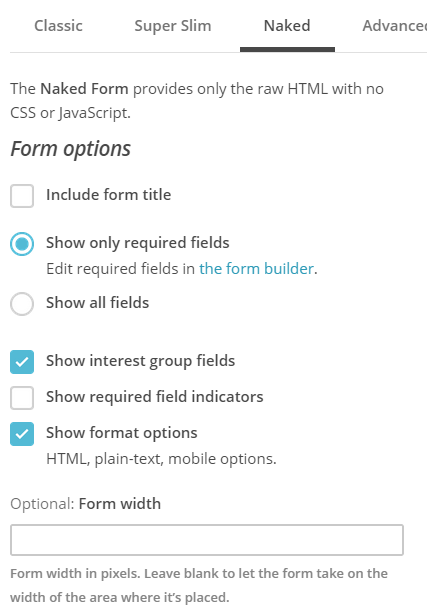
On this next page you can choose your form style and copy the embed code. I prefer to choose the Naked form, which is totally unstyled. Then I can style it myself to make it look perfectly integrated into my blog! Here’s what my settings will look like:
Here’s the final code that I copy and what it actually looks like on my site (below):
<!-- Begin MailChimp Signup Form --> <div id="mc_embed_signup"> <form action="//nosegraze.us4.list-manage.com/subscribe/post?u=73807f95703318188d5c1a204&id=ee443822d0" method="post" id="mc-embedded-subscribe-form" name="mc-embedded-subscribe-form" class="validate" target="_blank" novalidate> <div id="mc_embed_signup_scroll"> <div class="mc-field-group"> <label for="mce-EMAIL">Email Address </label> <input type="email" value="" name="EMAIL" class="required email" id="mce-EMAIL"> </div> <div id="mce-responses" class="clear"> <div class="response" id="mce-error-response" style="display:none"></div> <div class="response" id="mce-success-response" style="display:none"></div> </div> <!-- real people should not fill this in and expect good things - do not remove this or risk form bot signups--> <div style="position: absolute; left: -5000px;"><input type="text" name="b_73807f95703318188d5c1a204_ee443822d0" tabindex="-1" value=""></div> <div class="clear"><input type="submit" value="Subscribe" name="subscribe" id="mc-embedded-subscribe" class="button"></div> </div> </form> </div> <!--End mc_embed_signup-->
Make your form pretty!
Let’s use some custom CSS to make things a bit prettier.
Here’s the custom CSS I added:
/* Add some spacing below the email box */
.mc-field-group {
    margin-bottom: 5px;
}

/* Hide the label text */
.mc-field-group label {
    display: none;
}

/* Style the submit button */
#mc-embedded-subscribe {
    background: #ea672f; /* your background colour here */
    color: white; /* your text colour here */
    cursor: pointer;
    display: block;
    padding: 6px 12px; /* space between the text and the edge of the button */
    width: 100%;
}
And I added “Your email address” as placeholder text. I did that by changing this line:
<input type="email" value="" name="EMAIL" class="required email" id="mce-EMAIL">
To:
<input type="email" value="" name="EMAIL" class="required email" id="mce-EMAIL" placeholder="Your email address">
See how I added placeholder="Your email address" inside the HTML tag.
If you’re super serious about growing your list, here are 3 other awesome integrations.
- LeadPages: Create landing pages for your opt-in forms.
- OptinMonster: Add an email popup to your page.
- SumoMe: Add an email popup to your page.
Let’s talk about your challenge!
I’m not letting you off easy.
- If you want your blog to explode (in the good way)…
- If you want to get your posts in front of thousands…
- If you want to create a band of loyal followers…
- If you want to increase sales…
…you need to up your email game.
Don’t ditch other following methods, but make email your priority.
I’m not saying you have to remove Twitter, Bloglovin’, and Feedly links from your sidebar. That’s not necessary.
But your #1 method—the method that you clearly prefer and encourage people to utilize—should always be email. It’s the one platform that’s survived the true test of time and beats all others.
Here are your tasks…
- Select and sign up for your email service.
- Create your first list.
- Build your first opt-in form.
- Customize the form to match your blog.
- Add the form to your website.
Already done those? Here’s your next step…
- Add an opt-in box below your blog posts.
- Add an opt-in box below your header (if your theme allows for this).
Ready for some SUPER ADVANCED stuff?
- Sign up for MailChimp (paid).
- Create your first content upgrade.
- Follow MailChimp’s guide to send a file to new subscribers.
- Add your content upgrade to a blog post.
Are you a book blogger looking for some great content idea upgrades? Download my free PDF with 12 ideas!
Of course I’m going to have my own content upgrade in the post about building your email list! So I’ve put together a list of 12 content upgrade ideas specifically for book bloggers! I’ve got all the topics for you, now all you have to do is pick one and execute it.
Free Download
Download “Content Upgrades for Book Bloggers”book-blogger-content-upgrades.pdf – 33.39 KB
Are you ready for this challenge?
Leave me a comment and let me know which steps you’ll be executing on your blog!
If you have any questions about building your email list, please feel free to leave them in the comments below. I wrote this post as part of Bloggiesta and I’d love to help you get a handle on this aspect of blogging!



You get me, you really do… I literally am doing this right now! I just dumped Jetpack’s mail and went back to Feedburner b/c of the images thing. Not sure what to do about the 300 peeps on that list but oh well… Working on my opt-in bar tonight. And I’m on blog hops starting this week.
Dang you really are crazy timely!! Thank YOU for the guide now so I don’t miss anything!! I may even play in Mailchimp if I feel adventurous
Go you!!!
Sadly I don’t think there’s a way to import into Feedburner. You can export but not import.
The best thing to do might be to re-activate Jetpack one last time, publish a blog post asking people to re-subscribe, then turn Jetpack back off.
And you should totally take MailChimp for a spin. It’s free so you can try it out for a little while and see how you like it. Plus, with MailChimp you could import your old Jetpack subscribers!
Good luck!
This might be my favourite post ever! I have an account at MailChimp, but I got intimidated by the Campaigns. So I kept putting it off and neglecting my email list, it’s terrible. Thank you so much for this, Ashley! You always go the extra mile with your blog posts
Thank you Priscilla!!
MailChimp can be a bit confusing at first, I think because it’s so big and powerful and feature-rich. But once you force yourself to spend some time on it, it gets a lot easier. Learning the lingo also helps:
* What is a list
* What is a group
* What is a campaign
* What’s an RSS-driven campaign
And so on.. Luckily, MailChimp has a pretty extensive knowledgebase full of tutorials and articles.
I’m going to try now mailchimp
I think you’ll like MailChimp. I don’t use it myself, but it easily has the best admin interface from all the third party services I’ve seen.
I’ve been wanting to do more with my email list for a while but I wasn’t sure how or what to do next.
Thanks so much for sharing this, Ashley! I love your posts, by the way.
I hope this gave you some great ideas, Amanda Marie! I’m just beginning to expand my list too. For a long time I only sent out my blog posts to my subscribers, but I’m wanting to take that a step further and offer my subscribers more exclusive VIP content.
Oh, how I adore you, Ashley. This was exactly what I needed because switching to MailChimp was on my to-do list for my blog re-vamp. You just pushed me to start this right now. I’m excited! Thank you so much.
You’re so welcome! Good for you for taking action! *high five*
Hello Ashley! Thank you for your post, I really found it inspiring!
I use Feedburner on my blogger blog, do you know how can I discover the follower’s emails? (For example to check the mail during a giveaway)
Login to Feedburner
Click on “Publicize”
Click on “Email Subscription”
Scroll down to find the link that says “View Subscriber Details” and click that
Hope that helps!
Thank you very much!!!
I set up a Mailchimp account some time ago but never moved on to the step of actually building the list! I’m going to move this to the top of my list since it is so important and I love the valuable information you have shared here.
Good for you for finally getting things done! *high five*
Ok, now it’s like you’re in my head! First the scroll box, now this. lol
I have a mailing list with MC and I send out RSS emails daily/day after post (they are somewhat styled and with a featured image, etc). I have a sign-up on my sidebar, one below posts, one in my footer, and a ‘subscribe to newsletter’ button for when someone comments. I average about four sign-ups a month. Four.
So, I am wondering if you have suggestions for a freebie to offer readers (not necessarily other bloggers). I saw the spreadsheet for tracking reading, and maybe something like that would work? I was also thinking about a PDF calendar of new releases, but I am not sure if people would find that helpful. Any tips?
Thank you so much for the download, btw.
All of the things in the content upgrades download could also be used as a general freebie. You want to do two things when picking a freebie:
1) Identify your target audience. Think of the people who read your blog. Who are they? Are they readers? Fellow book bloggers? How old are they? What do they like to do? Use this to come up with freebies that your readers would be interested in.
2) Play to your strengths. There’s no sense in giving away a “reading planner” freebie if you’re not a planner yourself. There’s no sense in giving away a free plugin if you’re not a coder.
You want to combine #1 and #2 to come up with an idea that other people will like that YOU are also interested in and can deliver.
I think a lot of people would be interested in a spreadsheet for logging and recording the books they read!
A release calendar would be very cool, but that’s something you’d have to update regularly to stay in-date so I wouldn’t recommend it as much.
Thanks for the response, Ashley! I thing I need to get ‘out of my head’ and stop over-thinking so much about what to offer. I have a crudely-made checklist that I use while I am reading/reviewing/posting a book. If I make it prettier, it just might work.
Thank you for helping think about my upgrade in a different way.
With the Tweak Me 2 theme I can get this to work perfectly for mailchimp on my home page, but my blog posts still show the simple subscriber box aligned left with a border of my box color?. I use the exact same code on the widget home page and it looks lovely. Any idea what I am doing wrong?
Do you have a link to where you’re doing this?
jenniferdawsonauthor.com
From what I can tell, the one on the homepage is the “plain” MailChimp form. The one on the blog posts has some MailChimp styles included. You want to use the “naked” style form on MailChimp so that none of the default CSS gets included.
Hmm, both are the same exact naked form. I copied the hook into a widget for the homepage.
Weird. The hook at bottom of post and 1/2 front page widget had the same link, but I never changed the sidebar widget. When I copied the hook in there it fixed the hook at the bottom of the post. I would not have thought one interfered with the other..but it did
When you don’t use the “naked” version, MailChimp includes a CSS stylesheet. That gets loaded on the whole page of your blog so will affect any MailChimp forms on the page.
I’m taking your suggestions. But It’ll need some tweaking and I’ll have to look back over the last bit of your post. Because the Feedburner widget doesn’t seem to be working, so I may have to create my own image and do some linking. We’ll see. Thanks for the ideas though!
Are you using the normal Feedburner code they give you to copy and paste into a text widget?
I am, but the textbox where a person should be able to write their email in doesn’t seem to appear. The link version works fine, so I’ll just play with things and see if I can get it to work.
– K
I am trying to figure out how to put an opt-in at the bottom of my posts right now. Thanks. Love the idea.
You’re welcome!
Ashley have you been inside my head?!! First the scrolling text box then THIS! I downloaded your content upgrade and I have my blog tour tutorial on draft for months now and I didn’t think a list of blog tour organizers can be a content upgrade.
How do I do that though? Like, in the technical side. Can you teach/link me in some tutorial about creating a PDF file for offering a content upgrade and also on how I can make it instantly downloadable? Thanks Ashley!
You can make anything a content upgrade! Just make sure you also provide a lot of value “for free” in the post itself.
Here’s a link to MailChimp’s tutorial on how to deliver the file: http://kb.mailchimp.com/campaigns/images-videos-files/send-a-file-to-new-subscribers
Thank you so much for this post! I’m not officially participating in Bloggiesta, but am in the process of moving from Feedburner to MadMimi for my email subscriptions to enable weekly updates (rather than every time there is a post). There are some great tips in here that I’m going to try to implement (putting the form in places other than the sidebar and using some of your coding changes). I also had a fantastic experience with MadMimi’s tech support…they were so helpful and even customized some coding for me!
Wow that’s so great of MadMimi to help you out so thoroughly! Sounds like you picked a great service.
I had a quick question, I was wondering if you could give me some advice, I want to start a book blog, but I am not sure whether to have an actual blog or do vlogs instead. Do you have any advice on the pros and cons of each? Thanks!
They’re both solid platforms! You could even do both if you wanted. In fact, that’s probably what I’d recommend. Typically people choose vlogging over blogging if they enjoy watching videos more than reading blogs. So think of which one YOU like to read/watch move and go with that.
But yeah, you could try out both. That would give you an opportunity to experience both areas and figure out which one you naturally gravitate towards.
Wow! This is a fantastic and extremely useful post. You put it together so even a non-computer person like me can figure it out. Yay! As soon as I have a little time, I’m going to play around with this for sure! Thanks so much! Hugs…
You’re so welcome!!
Awesome post. I have a question about pop up opt-ins. Are they good, or not recommended? I already have it at the bottom of my posts, and on my sidebar. I just don’t know if a pop up would annoy my readers.
Opt-ins are proven to convert very well, so you will see an increase in subscribers.
BUT, they do massively annoy people. It’s suspected that one of the reasons you get a lot of subscribers is because some people think the only way to close the window is to enter their email (so they think they don’t have a choice ).
).
If you want to add a pop up, make sure you follow these rules:
* Use a service that has cookies so that if a user closes the window or subscribes then they don’t see the form again.
* DO NOT EVER EVER make the pop up display straight away. No one is going to subscribe before they’ve even read your post!
* Good pop up times/locations are:
1) When a user reaches a certain point on the page (like the end of the post, then it pops up).
2) When a user has spent a certain amount of time on the page (like 30-60 seconds).
3) When a user is about to click the “x” to close the tab window.
Thanks for the great post. I just switched from Jetpack to MailChimp. I didn’t do much customization yet but because of your challenge I was able to make the switch.
That’s so fantastic! Go you!!
Challenge accepted, Ashley! This is such a great post. I’m focusing right now on growing my email list, so will definitely follow your advice.
OK, I did it! I’ve been looking into an email subscription service for a while. i tried to figure it out at the beginning of the month, signed up for mail chimp, imported my subscribers and then didn’t finish. So all the people that loved me enough to subscribe have been in limbo for almost 3 weeks.
Now I think I have a campaign set up in mailchimp, I have opt in boxes after posts and on pages and I have it on the sidebar too.
Now I just have to figure out that extra content thing.
Thank you so much for the post.
Awesome job Emily!!
Great post! I have a MailChimp account and already do campaigns for my Book Club Picks series. I have a signup form in my sidebar and a link to a signup form at the bottom of each Book Club Picks post. But I’m going try adding an embedded signup form on those posts and will also add an embedded form on my About Me page, which I just updated yesterday. Thanks for the tips!
Sounds like you were already off to a fantastic start, Julie!
Thanks for the great tips! I really need to focus on my email subscribers, but have been a little intimidated by MailChimp. Need to explore all of my options!
Great post Ashley. I set up email a while ago and it has being growing slowly but steadily and I really noticed a difference after I added a subscribe opt-in at the end of each post. Now I’m ready to move on again and set up a freebie for new subscribers! I’m all about organising and tracking and so I’m be sprucing up my own excel spreadsheet and putting together my best organising tips! Thanks for the inspiration and the tips on how to make this happen. Much appreciated, my blog wouldn’t rock half as much without all your tips!
You’re so welcome, Trish!
I’ll be reblogging this today. Great stuff!
Thank you Dan!
Sent you a message from the related link mentioned in this one, but forgot to mention I use Mailchimp, too.
Thanks Ashley,
I found you one Debbie K site. I use male chimp. I think I am going to have to pay for lead pages though I don’t want to.
Hi Ashley, starting an email subscriber list is something I’ve contemplated (from a far distance) for a long time. I’d just decided to have a real go at setting up one, and
I came across Sacha Blacks post with the link to yours, so I’ve really got no excuse now! Thanks so much for sharing what you know. :))
Good luck Teagan!!
Hi Ashley!
I know this is an old post and I’m sorry to be bothering you with this. On my blog, I can’t seem to change the color of the “Subscribe” button. May it be because of my theme?
Thanks so much!