How do email filters work? How are they set up and whats is the best way you find to utilize them?
Mega
Filters combined with labels/categories are a great way to organize your emails. I find that filters are best combined with labels. A label is like a category in your mailbox. You can attach a label to certain emails, then view all the emails with that label. You can use filters to assign certain emails to automatically have a certain label applied. You don’t have to use filters in that way (there are other actions too!), but I find that to be the most helpful use of them.
Here are a few examples of how my filters work:
- I have my university email address set up to forward to my Gmail. So I created a new label for University and set up a filter so that any email addressed to my university email address gets a “University” label applied. That way I can clearly see which emails were sent to my school email.
- I get emailed whenever someone attempts to login to my blog. Sometimes I can get a lot of those, so I set up a new label for “Site Lockout Notifications” and set up a filter that looks for the subject “Site Lockout Notification”, automatically applies the “Site Lockout Notifications” label to that email, and has it skip the inbox (so that it only exists in that label and doesn’t clutter my inbox).
- All emails from *@formspring.me, *@postmaster.twitter.com, *@twitter.com, and *@pinterest.com skip the inbox and have the “Social Media” label applied.
- ..and more..
Now I’ll walk you through the steps on how to set up labels and filters on Gmail.
Step #1: Create a Label
On the bottom left hand of the Gmail window, click the button to Create new label. Now, think about what purpose you want this label to serve. For example, I have a label specifically for Creative Whim, and then sub-labels under that for new orders and designer applications. Maybe you want to make a label for design orders or review requests.
Once you’ve made your label, it’s time to create a filter! We’re going to use the filter to automatically send specific new posts that match certain criteria to that label.
Step #1: Create a Filter
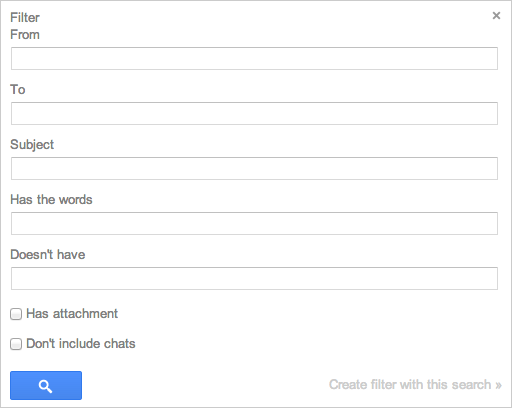
Click on the cog on the top right of the window and select Settings. Then select the Filters tab, and at the bottom of the page click Create a new filter. Now you need to fill out your parameters.
Let’s say you created a Review Request label and want to automatically send requests to that label. If you use a contact form like on WordPress where you can control the subject line of that email, then it’s super easy. In the Subject area, you just put the subject of the contact form.
For example, if you use Gravity Forms as your contact form you can set it up so that you get emailed new form entries and set the subject line to “Review Request from [senders name]”. So you could set up the filter to apply to all emails that contain the subject “Review Request from”.
Or, if you want to label all of your correspondence with publishers, you could set up the “From” field with all the publisher email addresses. So your entry might look like this:
*@harpercollins.com | *@tor-forge.com | *@stmartins.com | *@disney.com
(And you can add more)
So you’re basically saying: If the email comes from [something]@harpercollins.com OR [something]@tor-forge.com OR… etc. then do this….
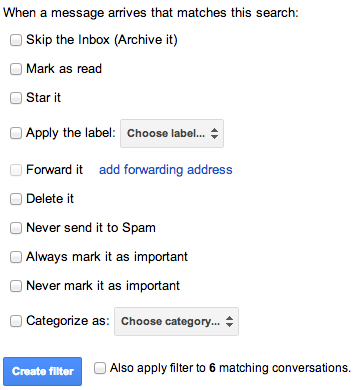
Once you’ve filled out your parameters, click Create filter with this search. Now here’s where you can decide what you want to do with the filter. You can apply a label, have it skip the inbox, mark it as important, etc.
Once you’ve selected the action, click Create filter and you’re done!
Examples of label/filter uses for book bloggers
Here’s a list of possible ways you can use labels and filters to organize your blog-related emails:
- Filter all blog subscriptions.
- Filter all blog tour/blitz invitations.
- Filter all email notifications about new comments on your blog.
- Filter book review requests.
- Filter all blog correspondence (works best if you have a “contact me” form on your website and you can control the subject line).


oooh, this is awesome. I have to get organized like this.
Thanks for the awesome post! I only have a few filters for particular things on my blog and for work and such. I didn’t know that you could do the *@harpercollins thing! That’s going to be so helpful. I thought you could only do like a full email. -Goes to make new filters for my Publishers label.-
Laura @ Music Plus Books
I don’t use gmail, but this definitely sounds incredibly helpful! I feel like instead I just have different email accounts for everything – one for uni, one for personal, and one for blog. It would be much more convenient to have it all go to one place but filter itself accordingly! Ah well. I’m set in my ways now
Wow this is really helpful! If I’d bother to do it… I guess it would be totally worth it but I don’t mainly use gmail.
Thanks for sharing, Ashley! <33
Great Tip! Thanks!
I love the Gmail filters option. I use them for just about everything. I probably have 20 or more filters set up for my book blog label
Gmail satisfies in several ways, and this is definitely one of them! I like how easy it is to organize your emails — most of the time, at least — and filter things into several folders. I use filters for my blog tours and Facebook: you won’t believe the number of emails I get from Facebook alone! It’s annoying to keep hearing my phone chime all day long because someone replied to my comment or blah. Separating different emails into different folders also help me to see which ones I need to reply first. Definitely a handy tool!
Thanks for sharing; just another of the reasons I love Gmail.
This is awesome! I do have labels set up (Review Requests, Reviewed, WordPress Backups, Denied, Other, and and a few more), but I never set up any filters. I just got done setting those up! Thanks for the idea!
I don’t really have need of that much filters. I remember when they introduced it, and I wanted to sigh. I hated it so much, and sometimes, my email app on the iTouch won’t load it. Maybe it would work if I used gmail, but I like having all my mail in one place.
But I could see why you would need it. The hardships of being self-hosted.
This was so helpful! I found myself getting really unorganized with my emails but now I can find everything I need. Thanks Ashley!